Send us your questions

Some of our visitors have sent emails with interesting questions, we decided to start having a space to answer them. In this space the blog "Restless Minds" will answer all questions you send us
Send us your question for the email: Restless Minds.

Science progress affects our daily life and "to know" means you are going to chose right, because it allows you to form your own opinion on scientific everyday issues. On the other hand, having an elegant and harmonious vision of the world where we live in leads to a feeling of intellectual satisfaction.
We believe this kind of scientific day to day knowledge should be encouraged from an early age, and that's why this project was born: science, culture, knowledge, crafts for your restless mind.

Saturday, March 8, 2014

Today is IWD, International Women's Day

The International Women's Day (IWD) was originally called International Working Women's Day, this date is related with women strikes for equality at work and voting rights. Every year on the March 8 all women are remembered, specially those who perish fighting for what they thought was right.

Congratulation to all women.

Et voilá! 
Enjoy!

Sunday, October 20, 2013

Halloween hat craft

This is a simple project, inexpensive and suitable for all ages

What we need:

  • 2 sheets of black cardboard
  • sheet of felt (green, orange, purple, or red), you can use other materials like fake cobwebs, paper gloss, or anything your imagination wants,
  • white glue,
  • scissors,
  • tape,
  • ruler
  • compass. 
How to:
  1. Fold the cardboard in a cone shape, this cone has to be so tight as your head;
  2. Fix the cone with tape;
  3. Cut the free ends in the bottom of the cone with the scissors, this free end is the triangle that is formed on the base of the cone when you fold the paper, cut it, so that the base becomes a circle;
  4. With the compass, draw a circle on the second card sheet with less 1in of radius then the opening of the hat, use a ruler to measure the diameter of the opening (the diameter is the distance between 2 points in the circle passing in the center of it). Now, divide this value by 2, you will get the radius;
  5. Draw a second circle, concentric with the first but with more 2 to 3 in in radius then the first one, concentric circles have the same center;
  6. Cut out the larger circle;
  7. Cut out the inside of the smaller circle, This is where your head goes;
  8. Place the cone centered on top of the circle;
  9. Apply a layer of glue in this junction;
  10. Let it dry;
  11. Turn the hat up side down;
  12. The small circle is slightly smaller than the opening of the hat, about 2in remember?, with small scissors make small cuts on this cardboard flap, at the end you must be able to flap it inside;
  13. Apply glue inside the cone;
  14. Bend the cardboard in;
  15. Press;
  16. Let it dry;
  17. Cut some felt strips;
  18. Wrap and glue them around the hat;
  19. Use stencil-like images to decorate your hat.
Halloween colors:

Black, orange, purple, red and green.


You can use theses 5 stencils to decorate your hats:

Ghost

Bat:
Spider:

Pumpkin

Witch

Et Voila!
Bu!

Enjoy!

Tuesday, October 1, 2013

Spiders with plastic bottles

This is a great and easy idea from decor e culinaria" blog. his project will keep your restless occupied for a few hours and will save you some money when the time to decorate Halloween comes. In addition is a project that recycles and reuses old plastic bottles.

What we need:
  • plastic bottles, any size will do,
  • craft knife,
  • scissors,
  • thin rope or twine,
  • electric driller, small,
  • black acrylic paint,
  • small brush,
  • fishing line,
  • sewing needle,
  • old newspaper, to protect the surface.

How to:
(this project requires adult supervision!)

  • Drill 2 small holes near the bottle opening;
  • Drill a 3th hole in the bottom;
  • With the craft knife cut the bottle in 2 parts, like the image- one will look like a funnel, the other like a cup;
  • Paint the 2 parts with the black paint;
  • Let it dry;
  • Paint the interior;
  • Let it dry;
  • Use the scissors to slice the cylindric half, like image 7, this will do a sider with more then 8 legs... it's a Halloween mutant;
  • Bend the plastic slices in two points, one near the spider body, and the other like a knee (halfway the end of the leg).
  • Follow the image 9 and 10 to cut and bend the other half of the bottle;
  • Remember the drilling job you did at steps 1 and 2? Use the holes, the fishing wire, and the needle- if you need it- to hang the spiders on the celling;

  •  


    Et Voilá!
    Everyone will love this black and huge spiders!

    Enjoy!

    Saturday, May 4, 2013

    Emulsion, oil/ water coloring droplets

    Cleaning the fryer back home is not exactly easy. Who usually does this knows that is a messy, sticky and dirty work. To minimize this greasy effect we usually fill the fryer with boiling water and add detergent on a very generous amount. In fact I usually pre wash all the dishes before putting them in the machine. Why? Because it allows the fat to dissolve in the water and not inside the machine or in my hands.

    Why?
    Because the detergent is an emulsifier, and as such promotes the formation of emulsions.
    An emulsion is a system consisting of two immiscible liquid phases (oil and water). We may have emulsions of oil in water (O / W: external aqueous phase) and water in oil (W / O: oily external phase).
    The emulsion stability is ensured with use of emulsifying agents such as detergent, surface-active substances generally.

    We will need:
    • 3 transparent cups, glass or plastic,
    • water, enough to fill two cups,
    • cooking oil,
    • food coloring,
    • pencils.
    How to:
    1. Fill one of the containers with water (2/3) and the other with the same amount of cooking oil;
    2. Add 3-5 drops of food coloring to each, leave some space between the drops so that they do not touch each other;
    3. What happens?
    4. Fill the third container with water up to 2/3, add some oil, enough to form a layer on top of the water.
    5. Add the food coloring the same way as in the previous point. Try to predict what will happen;
    6. What happens?
    7. With the sharp pencil touch a droplet of colorant of the third cup;
    What happens?
    When the food coloring is added to water, it blends completely with it. When you add the same food coloring to the oil, a small sphere is formed on oil surface.

    Why?
    Water molecules are polar, in other words they have a small positive charge at one end and a small negative charge at the other, for this reason they remain together, by forming hydrogen bridges. Unlike water molecules, the oil molecules are non-polar - have no charge-, for this reason, the molecules of oil also tend to stick together.

    When we "force" an oil to mix with a water based solution (the food coloring) those form an emulsion.

    A emulsifier it's a molecule with to different ends, one that loves water (hydrophilic) and a second that hates water (hydrophobic). Imagine a wood stick with two ends, one of them "sinks" in the oil- the hydrophobic end- the other in the water- hydrophilic end. This phenomena is responsible for the formation of small oil droplets -spheres- in the water. This is a stable structure and it's what we call emulsion, many things around us at home are emulsions like mayonnaise and face creams, for example.
    If you try to mix the jar 3 emulsion you will verify that after a while the oil will came back to the top..

    When you use food coloring (FC), what happens is that the FC droplets drag a small amount of oil with them as a "coat", that's why the FC stop in the oil. the oil acts as a life saver coat, preventing the droplets to drawn. When you punch the droplets with the sharp pencil, the "oil coat" is broken and the FC- a water based solution- blends, almost immediately, with the water bellow the oil. 

    Go further
    If you want to go further change the variables, one at time and take notes.
    • Use different kitchen oil types;
    • Use vinegar or any other kitchen liquid instead of FC.

    Et voilá!
    Now you can avoid your daily bath: "Mom I'm hydrophobic!"

    Enjoy!

    The air takes space- water in the jar

    This is a very simple demonstration that proves the air takes space


    We will need:
    • 2 jars,
    • funnel,demonstração, experiência de física, pressão, propriedades do ar, água,
    • water,
    • modeling clay, a lot,
    • coloring, food coloring is the best,
    • pencil, or a pen, a wood stick, something good to punch the clay ...
    How to:
    1. Fill half of the jar with water;
    2. Add a few food coloring to the water, 3 or 4 drops;
    3. Place the funnel in the jar;
    4. Seal the jar area around the funnel with the modeling clay, the air can't go in or out through the jar/funnel contact zone;
    5. Now fill the funnel with some more water.

    What happens?
    A small quantity of water rolls through the funnel into the flask, but in a few seconds stops, despite the funnel is full of water.

    Why?
    There is no more space in the jar! The jar is half full of water and half full of air, we must to take the air out in order to get the water get in.

    Use the pencil to open a hole in the clay.

    What happens?
    The water immediately falls into the jar.

    Why?
    The water "falls" and pushes the air out the jar, now the air can get out through the hole.


    Et voilá!
    Easy uh?

    Enjoy!

    Growing crystals at home

    What is a crystal?
    Crystals are regular structures formed by a regular repeating pattern of atoms or molecules.

    These structures grow by a process called nucleation. During nucleation, the atoms or molecules of what we want to transform in a crystal (solute) are dissolved in a solvent. The particles of the solute will tend to cluster together, forming subunits of atoms or molecules. These larger particles will also group with each other and eventually become large enough to "pop out" the solution (crystallize).

    Other solute molecules will continue to adhere to the surface of the crystal, causing it to grow until equilibrium is achieved between the solute molecules in the crystal and the solution.

    Growing crystals
    Three factors that can influence the growth of "home" crystals:
    • A good/poor solution saturation- The first stage of home crystal growth is a saturated solute. In a saturated solution the probability of molecules colliding with each other in order to form a core for initiating nucleation is greatly increased.
    • Surface type-A rough surface tends to be more attractive for nucleation. It is more likely that a crystal is formed on a piece of rough rope than the in the smooth walls of a glass.
    • The presence of deposits in the bottom-This occurs when the solution is not scrambled or means that too much solute was added to saturate the solution. The presence of these deposits create areas for optimum crystal growth however prevents crystal formation in the "target."
    Lets see how to grow sugar crystals, these crystals can be sucked and eaten like a lollipop. This demonstration may take up to 3 weeks.


    We will need:
    • 3 cups of sugar, we have to adjust this quantity, we want to saturated at 100% but no precipitate,
    • cup of water, to boil,
    • food coloring,
    • small jar,
    • small bowl,
    • wood stick, or rope,
    • kitchen paper or paper filter.
    How to:
    1. Boil the water, careful with burns!;
    2. In the bowl, mix the boiling water with the sugar;
    3. Stir the water until all the sugar is dissolved;
    4. If you want to give sugar some color, now it's the time, add the food coloring;
    5. Place this solution in the jar, attention! wash the jar really well to avoid nucleation in it's walls;
    6. Avoid any amount of sugar precipitate in the jar- any not dissolved sugar-, this sugar will be a good nucleation "start point";
    7. Suspend the stick or rope in the solution, do not wash those, we want this to be a suitable "start up" spot for nucleation;
    8. Chose a nice and quiet spot to place your jar for at least 3 weeks;
    9. Wait until the solution cool and cover it with a paper filter. 
    What happens?  
    After cooling the solution will use nucleation spots to form crystals.

    NOTE: You must check the jar on daily basis, if you see any nucleation in jar walls, change the jar;

    Wait about 3 weeks for excellent results.

    Go further:
    • Follow the growing crystals with a graph;
    • Use salt and compare the growing velocity with the sugar;
    • Use 3 jars, in the first one use boiling water, in the second tepid water, and in the last one repeat the essay with cold water;
    • Try to dissolve the sugar/salt/other while the water is boiling;
    • I am sure you can remember other ways to change this demonstration into a experiment...
     Source: about.com; squidoo.com; buzzle.com
    Et Voilá!
    Science you can eat!  

    Enjoy!

    Saturday, April 6, 2013

    Princess Rashid- Art with science


    I found Princess Simpson Rashid while I was googling in Internet about the Periodic Table of chemical elements, her paintings just popped up when I asked google to see "images".  My first thought was "wooo this is soberb, I have to post this". I found it so amazing that, for the first time in "Mentes Irrequietas/ Restless Minds Boosters" blog history, I felt I should write the artist before I post it, and so I did it, Princess Simpson Rashid answered me next day giving Restless Minds permission to post her work, thats why for the first time- of many more, I hope- the image has the "used with permission" statement.

    Princess Simpson Rashid is a passionate with science. She is a Bachelor in Physics- Georgia State University-, and she studied printmaking and painting at the Escuela de Artes Plastica in San Juan, Puerto Rico.

    Science-Inspired Abstraction, Modern Sport-Fencing, and Expresssionistic Landscapes are the main themes she turns to in her work. Today we are going to see only a small part of her work, the Science-Inspired Abstraction.
    If you like the images you are going to see next, I strongly advise you to check Rashid website, her work is "super restless" and full of color and good energy.
    At this moment Rashid lives in Tampa, Florida, USA, and in her own words:

    "My current body of work explores the relationship between abstract art and math, color and music, composition and perception. I use line and color to convey movement. My painting technique often involves dripping and pouring paint until I’m satisfied with the composition. My artistic goal is to capture the individual energy and essence of the subject matter by whatever means available to me. Color, texture, design and energy are the components that make up all of my work.." in http://www.foglefineart.com/artists/profile/rashid-princess/

    In this paintings Princess Simpson Rashid is a true art scientist, or "sciencartist" if you want, she uses the elements of Periodic Table, the x's and y's from math and even Pi constant from geometry (the famous 3,14). Super Restless uh?

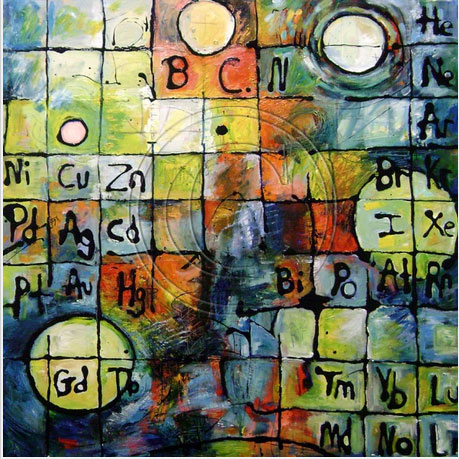
    ©Princess Simpson Rashid, "Periodic Table-2",  Acrylic on Canvas, 36 x 60 inches. www.princessrashid.com Used with permission.

    ©Princess Simpson Rashid, "Periodic Circles 2",  Acrylic on Canvas, 36 x 36 inches. www.princessrashid.com Used with permission.

    ©Princess Simpson Rashid, "Composition B",  Acrylic on Canvas,48 x 24 inches. www.princessrashid.com Used with permission.

    ©Princess Simpson Rashid, "Composition A",  Acrylic on Canvas,48 x 24 inches. www.princessrashid.com Used with permission.

    ©Princess Simpson Rashid, "Periodic Circles 1",  Acrylic on Canvas, 36 x 36 inches. www.princessrashid.com Used with permission.

    ©Princess Simpson Rashid, "Pi-1",  Acrylic on Panel, 24 x 24 inches. www.princessrashid.com Used with permission.

    For more informations please consult Rashid website, and her blog.

    Sources: 
    http://www.foglefineart.com 
    http://princessrashid.com

    Et voilá!
    Science and art holding hands!

    Enjoy!
    Related Posts Plugin for WordPress, Blogger...